
Sending Emails in WordPress: Everything You Need to Know
27 January, 2023
0
0
0
Contributors

With WordPress, send email function could be tricky to master. Sure, there’s wp_mail, but it’s unreliable for several reasons.
For example, WordPress web hosting services have different PHP mail configurations. Or they even block sending entirely to prevent spamming. Then, the native wp_mail has very limited capabilities when it comes to the type of emails you can send.
There are WordPress hosting providers that include usable configuration for each WordPress site, but it’s an exception rather than a rule. And if you’re tech-savvy, it’s possible to configure WordPress manually to ensure your emails get delivered.
Either way, this is a developer-minded guide that will lead you through different scenarios and show you how to integrate Mailtrap SMTP (Simple Mail Transfer Protocol) with your WordPress site.
How does WP send emails?
In a nutshell, WP sends emails using PHP. And you have three options to send emails in WordPress – use the native wp_mail function, use a WordPress plugin, or manually set up an SMTP server using wp-config.php.
The following sections give you the steps for each method and tell you about potential downsides. Beyond that, you’ll learn how to test sending on WP, include CC and Bcc, format emails to HTML, and resolve common email service issues.
How to send emails from WordPress using wp_mail() function?
Wp_mail() represents a PHPMailer class wrapper that utilizes the hosting web server when sending emails. But there are 24 more WP functions that use wp_mail(); combine that and web server sending, and it’s not surprising that this method is unreliable.
Here are the steps wp_mail() function takes when attempting to send your emails.
- The code snippet to specify the recipient, subject, message, etc., and prepare an email.
wp_mail( $to, $subject, $message, $headers, $attachments );- After preparation, wp_mail() calls the PHP mail function, which is in the PHPMailer lib, to give instructions to the server to send emails.
mail(to, subject, message, headers, parameters);- Your WordPress hosting provider attempts to deliver the email. More specifically, the hosting side servers request to use PHP mail to send emails. Then, these servers typically use SendMail or Postfix to route the emails to their destination, and the receiving host rejects or accepts them.
Rejects are quite often, and it’s not uncommon that your email won’t be sent out at all. As mentioned, this depends on several factors, primarily your WP hosting provider and the limitations of wp_mail() function.
Note that WordPress native function makes it tricky to build HTML templates or add attachments and images without additional tweaks. More importantly, it struggles with email headers, which is one of the reasons emails sent using native wp_mail() may land in spam.
How to send emails using the WordPress SMTP plugin?
Installing a WordPress SMTP plugin resolves many of the native configuration issues.
How?
For starters, a plugin reconfigures wp_mail () function to use SMTP rather than relying on PHP. Then, a plugin routes the outgoing email through an email sending service.
This may mean that you need to set up an account and verify your WordPress site with a third-party sending service.
Of course, there are a few steps to the process, and you’ll need an additional tool to get a reliable SMTP. But a combination of an email delivery platform such as Mailtrap and an email plugin gives you the upper hand to streamline your email delivery and protect your sender and domain reputation.
The following sections guide you through Mailtrap and WP Mail SMTP plugin setup.
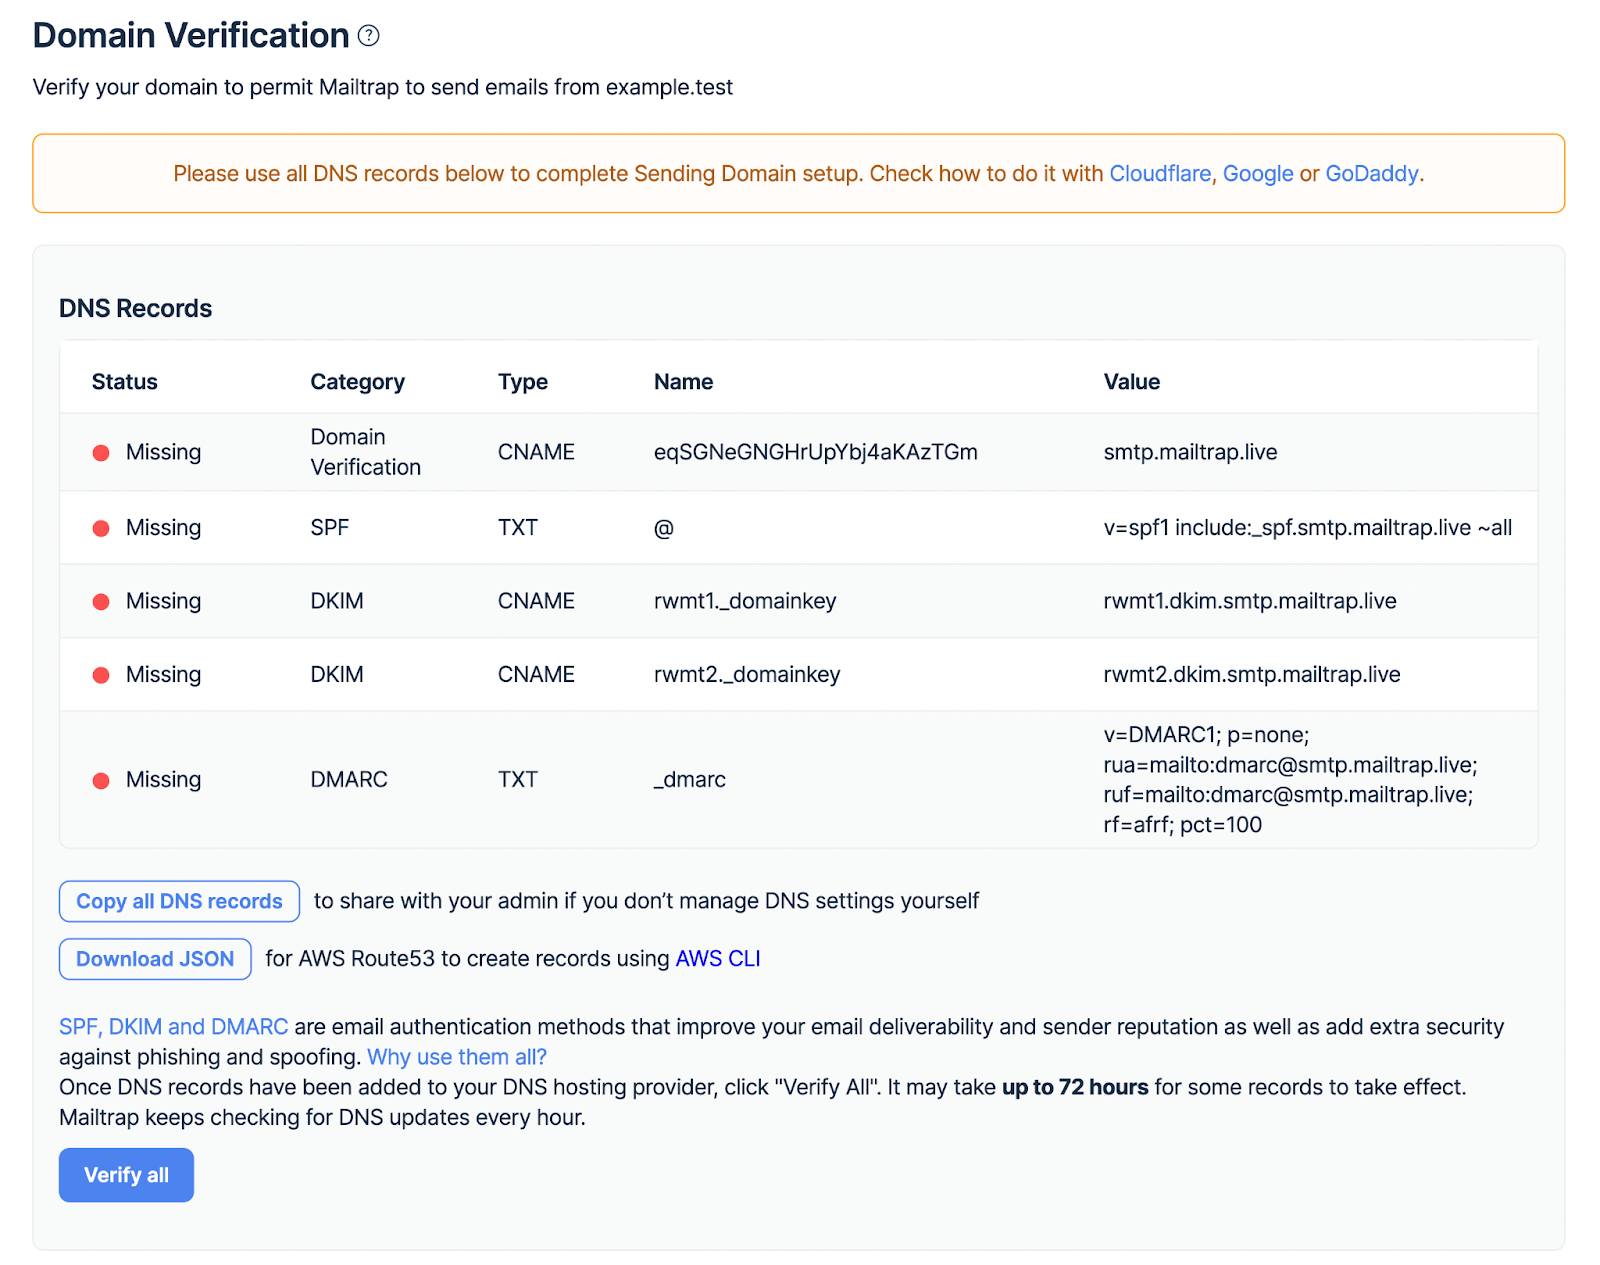
- Set up Mailtrap and verify your domain
Go to Mailtrap and create an account. Then, access Mailtrap in-app homepage and click Setup Domain under Email API.

- Mailtrap SMTP and Plugin installation
After verifying your domain, go to the next step and choose SMTP under API and SMTP Integrations.

Under the General tab, you can change the From Email (email sender) and From Name. The plugin populates these automatically with the WordPress account email and your domain name, respectively.
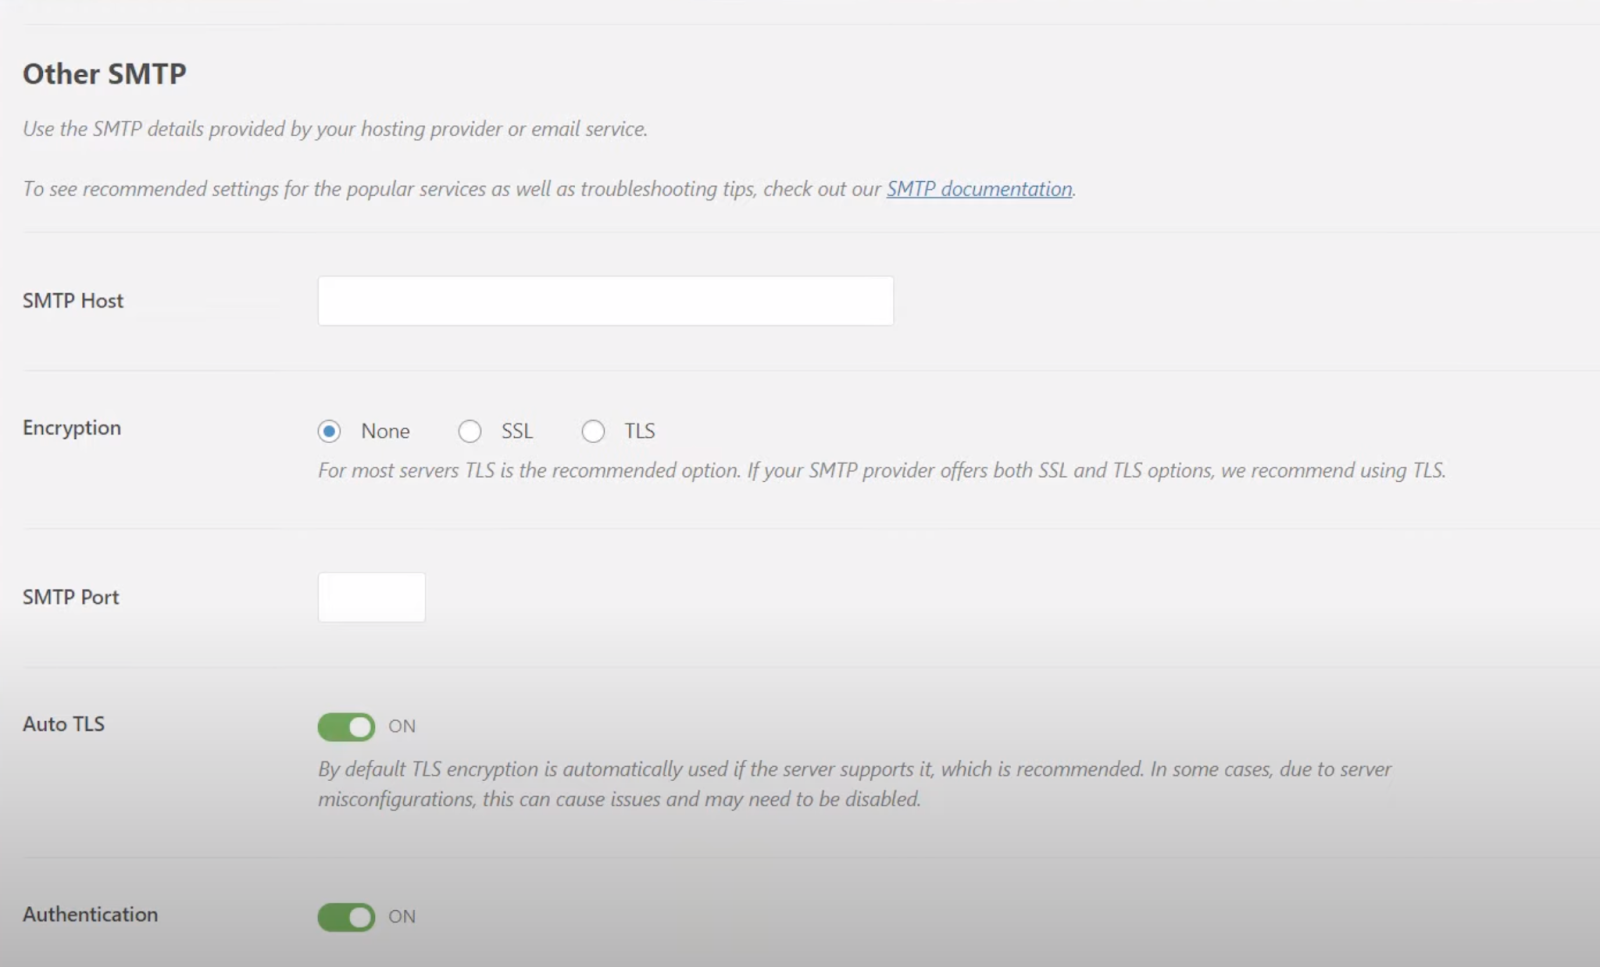
Scroll down to the Mailer section of the General tab, and select the Other SMTP to set up Mailtrap SMTP. The Mailer section also features Sendinblue, Mailgun, SendGrid, Amazon SES, Gmail SMTP, etc. Keep the selection at Other SMTP, and note that it’s important not to use PHP, which is selected by default.

Scroll down to add credentials for Other SMTP, and start copy-pasting Mailtrap SMTP settings into the designated fields.

The default SMTP Username for Mailtrap users is api, and each user gets a unique password. We hide a chunk of the password for security reasons, so just hit the Copy button and paste it into the SMTP Password field.
Lastly, click the Save Settings button; you’ll see the confirmation notifications at the top of the WP Mail SMTP General tab.
Security Tip:
In this setup, the SMTP password gets stored as plain text. So it’s best to introduce another security layer within the wp-confonfig.php file using the two lines of code below.
define( 'WPMS_ON', true );
define( 'WPMS_SMTP_PASS', 'your_password' );
Note that the action disables the password field from the settings. Nevertheless, you’ll be able to securely access and use the SMTP service.
- Test the settings
Click the Email Test tab in the WP Mail SMTP plugin menu, type the email to Send To, and hit the Send Email button. Keep the HTML option toggled on; once the test email is successfully sent, you’ll get a notification at the top of the tab.
Lastly, go back to Mailtrap and click the Verify Setup button to confirm the sending test. The email you send will also appear under Email Logs in our app.

How do I send an email from WordPress without Plugins?
This is the method for the tech-savvy as it requires manual SMTP configuration on WP via wp-config.php and some tweaks to your WordPress theme. But, when done right, this could be the most straightforward method that doesn’t bloat your WordPress website with additional plugins.
Sure, you’ll need an SMTP service to make it all work. And the following tutorial assumes you’ve set up Mailtrap and verified your domain. If not, check the previous section.
Also, you should be using the child theme of your WP site. Otherwise, the changes will be reverted back to PHP after the main theme update.
- Find the wp-config.php in the website’s root directory, and edit it via SSH terminal or FTP server.
- Paste the settings below into the wp-config.php
Note: the settings should be located under the given file for security, and they’re geared for Mailtrap users. If you’re using Gmail SMTP, for example, the values will be different.
// SMTP email settings
define( 'SMTP_username', 'api' );  // host username
define( 'SMTP_password', 'your-mailtrap-smtp-password' );   // Mailtrap SMTP password
define( 'SMTP_server', 'send.smtp.mailtrap.io' );     // SMTP server address
define( 'SMTP_FROM', 'youremail@example.com' );   // Your Email Address
define( 'SMTP_NAME', 'Your Name' );   //  Business From Name
define( 'SMTP_PORT', '587' );     // Server Port Number
define( 'SMTP_SECURE', 'tls' );   // Encryption - ssl or tls (recommended)
define( 'SMTP_AUTH', true );  // Use SMTP authentication (true|false)
define( 'SMTP_DEBUG', 0 ); // for debugging purposes only- After manually configuring SMTP, navigate to the functions.php (the theme functions file) by selecting WordPress dashboard, then Appearance, and finally Theme Editor. Then, you need to copy-paste the snippet below for the changes to take effect. To remind you, it’s best to use the child theme.
- Add the code snippet below to the functions.php file.
add_action( 'phpmailer_init', 'my_phpmailer_smtp' );
function my_phpmailer_smtp( $phpmailer ) {
    $phpmailer->isSMTP();
    $phpmailer->Host = SMTP_server;
    $phpmailer->SMTPAuth = SMTP_AUTH;
    $phpmailer->Port = SMTP_PORT;
    $phpmailer->Username = SMTP_username;
    $phpmailer->Password = SMTP_password;
    $phpmailer->SMTPSecure = SMTP_SECURE;
    $phpmailer->From = SMTP_FROM;
    $phpmailer->FromName = SMTP_NAME;
}- Save your new settings, and keep in mind that you can just copy-paste the code, no need to change anything.
- Lastly, you can test your new configuration and send an email via a contact us form.
Thank you for reading a part of Mailtrap article! If you want to proceed discovering this topic further to learn other ways of sending, feel free to follow this link.